
I decided to make this on a whim one day when I heard garbage disposal and Margarita blender in the same sentence.
After getting permission from the wife to spend some money on a useless project, I got started. What I ended up with has been a lot of fun at several parties, and overall has been worth the effort to build. Margaritas were the only drink I have made in this machine for the first couple of years, but we have used it for Piña Coladas and Daqueries as well. It should work equally well with any frozen drink.
The Good:
> While not silent, it is much quieter than your typical blender.
> It is fast. If you have the recipe down for quantities (including ice volume), start to finish is less than a minute and a half (well, maybe 3 minutes)!
> It is a fantastic conversation piece. (Just remember to give credit here for the design.)
> One batch serves a lot of people (or a smaller number of very thirsty people.)
> It can make up to about 4 gallons (final volume) of margarita at a time.
The Bad:
> It really does not work well for less than 1 1/2 to 2 gallons (final volume) of drink.
> It is pretty expensive for a blender. As built, the original unit cost about $300 and 10 Hours of labor. My latest version is up to about $450 plus 15 to 20 hours of labor.
Building it:
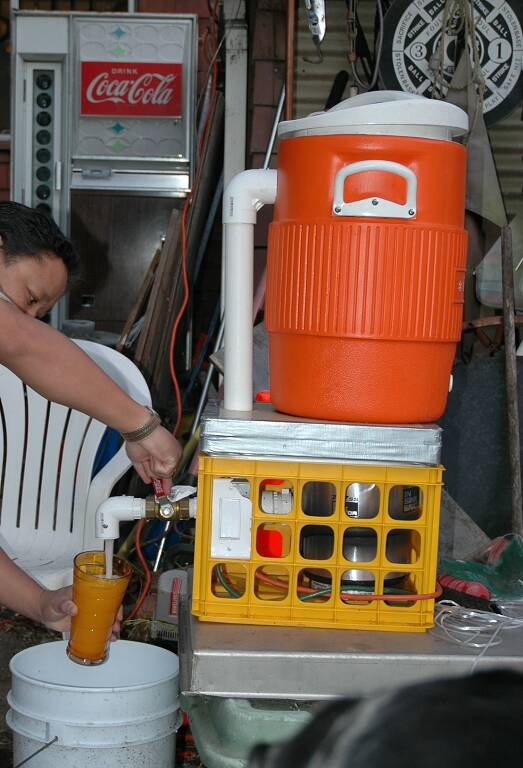
The two primary pieces for making this are an Igloo 5 gallon cooler/drink dispenser and a garbage disposal.
I am sure you have seen the Igloo Cooler/dispenser in use by road crews or the like, and may have one or two around the house. In my case, I had two of these, one within easy reach, and no expected need to use it in the foreseeable future. As a note, I have stayed with Igloo because the top lifts off. The screw on tops make life more difficult when mixing and demonstrating.
The garbage disposal was the item I expected to have to pay some money for (and did!) I wanted a brand new unit, since it was going to be processing drinks which many people (including me) would be drinking from. I intended to get the least powerful unit I could find, since the power of the disposal unit ends up heating the drinks. I went to Home Depot, and found their display of InSinkerator units, and found out that I had to buy the one horsepower unit to get all stainless construction in the working parts. This may not be a real issue, but I do not like the idea of having bits of cadmium plating in my drink, whether I can see them or not. As a result, I bought the Insinkerator 777SS disposal unit for around $200.00 (well, that is what I remember paying). The equivalent unit from Home Depot today is $350.
The output of the disposal unit is a 1 1/2 inch waste fitting. It turns out that many of the plastic trap units for home sinks are made of PVC now and that an extension tailpiece (with a simple flange at one end) works to connect to the disposal unit real well. The piece that is provided with the unit makes an immediate 90 degree turn, which does not work well with the design I was working on, and as it adds another turn that is not necessary, it adds unnecessary friction heating that is also unnecessary. (Honestly, the difference in heating is almost certainly negligible, but I occasionally think in these terms when I am planning.)
Initial Construction
So, once I had the basic parts in hand, the construction begins:

Picture 1 shows the basic Igloo 5 gallon drink cooler/dispenser, the hole saw (3 1/2”) and the disposal flange parts.


Pictures 5-10 show the assembly of the flange to the cooler.

Putting the disposal sink flange into the cooler turned out to be a bit of a challenge. The manufacturer was obviously thinking in terms of mounting the flange on a sink that was no more than 1/4 inch thick. Despite this, they were very generous in the depth of the flange they provided, but almost not generous enough. The bottom of the cooler is over an inch thick, so the base has to be compressed a bit to get the flange to fit properly. To this end, I built a Flange tool (for want of a better description) to compress the cooler foam core while installing the disposal flange.
The tool is made up of two pieces of nominally 3/4″ wood. The smaller piece can be drilled out of a piece of wood with the same drill used to drill out the bottom of the cooler. The larger circle should be 3/4″ to 1″ larger in diameter (actually, I used a 4” hole saw for the larger piece). It has to seat on the flange, but not extend beyond the flange edges.
The two wood disks are screwed together through the centers so they do not shift. Bolt hole location are on a diameter, set as wide apart as possible without having the bolts hit the inner diameter of the flange. 3/8″ carriage bolts were used.


The flange, the support base and the flange ring are all part of the disposal unit. Normal assembly instructions can be found in the installation instructions provided with the disposal unit.
After the flange is pulled far enough into the collar far enough, the retainer ring (part of the Disposal Kit) is installed.
Then the disposal unit itself can be installed.

Picture 11. The output from the garbage disposal is 1 1/2 waste line. A plastic 1 1/2 tail piece will fit this just fine.

The hose is not so neat, so next I assembled an output and loop arrangement. Most of the Plastic fittings are 2″ Schedule 40 PVC.

The original version used a 2″ Tee with a PVC Waste type compression fitting in one end, and a 1″ NPT adapter in the other. In later models, I have reduced the NPT adapter to a 3/4 inch female adapter.
I had to turn down some parts to force these together close enough for everything to fit.


Pictures 14, 15 and 16 show how the Tee is assembled with the tailpiece, which must be cut down to fit closely with the cooler. Newer disposals use a rubber output flange, so there are slight differences in the attaching hardware.
A 1” ball valve is screwed onto the 1″ male adapter. Then a 1″ street elbow (Male Thread on one end, and female slip joint on the other). The slip joint end of the elbow is the end that fills the drink cups.


The above pictures show the test with the assembled unit and testing at this phase.


I did not want pipes hanging out everywhere, so I assembled the return line to go through the side of the cooler. As can be seen, the line goes vertically from the Tee to an Elbow, where it goes straight through the side of the cooler. The height is as High as I felt safe putting it and still avoiding the closed lid. (Note the picture above where the lid is lifted so you can see the depth it goes to in the cooler.) Also, if the cooler handles are at 3:00 and 9:00 clock location, and the dispenser valve (as supplied by Igloo) is at 6:00, the hole for the return pipe is at 12:00. This allows somewhat easier carrying.
Inside, I put an elbow, but cocked it off at about 45 degrees from vertical. I did this to enhance the mixing action, by swirling the mixture.
I did not glue the vertical pipe to the Tee, nor did I glue the cross piece and return elbow at the top of the vertical section. I figured that friction and geometry would keep the parts together, and this way, I can disassemble the machine should it be required.

Picture 21 – For neatness, I wanted the unit to be able to sit on something more stable than the bottom of the disposal unit. I chose to use a milk crate (from Target). Unfortunately, this choice required that I lift the bottom of the cooler a bit over 2 inches above the top of the milk crate. I used three pieces if 1″ composite over paper honeycomb to accomplish this. Picture 22 shows the assembly if the honeycomb sheets. I took some playing and multiple assembly/disassembly/assembly sessions to get it right.


The milk crate has to have an area cut out for the delivery nozzle, and a smaller section cut out for the on/off switch. I used the switch cover plate (cut down to fit the rectangular hole in the milk crate) to hold the switch box in place. Note that I tried to use a circular saw to cut the switch plate. Bad Idea. I will replace this eventually, but it does not affect performance.
Also note from picture 22 that the machine needs occasional cleaning. In this picture, it has been sitting a while, and I forgot to clean out inside the crate area after the last use. This does not affect health issues, but if anyone sees it, it looks sort of gross.
After building two of these on milk crates, I changed over to a metal frame. This allowed me to get the size right so I did not have to put so much spacing above the crate. The frame is made by welding a cage made of one inch square steel tubing. I start with four pieces of one inch tubing, 48 inches long. I then cut this into three pieces each, one at 15 inches, one at 16 inches, and one at 17 inches. The 16 inch pieces are used for the verticals with the top and bottom open. I also welded an electrical box to the frame and cut a black acrylic face-plate for a switch. Then a used a one inch piece of wood for the top.

Preparation for first use:
I strongly suggest that after you finish building this unit, you run two or three batches of water (4 gallons or so at a time) through the machine with the disposal running for at least ten minutes at a time. This is to clean out any manufacturing waste/junk; either what you created, or what Insinkerator left behind. The last batch would be a good time to experiment with how much ice you will use, and what happens if you use too much ice (the crushed ice tends to stagnate in the bottom of the cooler).
Notes on usage:
First of all, this is not the machine to use for making Margaritas for two. I tended to use the Cuervo Gold tequila, and the Cuervo Margarita mix. I buy these at Costco in 1.75 liter bottles. The recipe calls for three parts of mixer to one part of tequila. I use about two parts mixer to one of tequila. More recently, Costco sells their own version of mixer (Kirkland) which mixes best at about 2 1/2 to one with Tequila. I have also found that the Kirkland Silver Tequila works very well. So, minimum batch is two bottles of mixer (two and a half with the Kirkland) and one bottle of tequila. The liquids go in first, then turn the machine on and start adding ice. It shreds and mixes the ice very fast, typically, less than a minute after adding the last of the ice, the consistency is ready to serve.
A problem I have noted recently is that as the cooler gets fuller, ice has tendency to float a bit as it hits the mixture. Sometimes, this can be overcome by taking a glass and using it to push the ice down. The other thing I have tried with some success is a length of 3 inch pipe with some cutouts at one end. Put the end with the cutouts down to the intake of the disposal (the cutouts allow some of the mixture to flow, but the pumping action keeps the pipe fairly empty, so adding ice into the pipe puts it directly into the disposal. Mostly, these days, I simply try to put the ice in a bit more slowly and center it to the degree I can. A bit of floating ice is not much problem as it will not clog the system unless if freezes into a large clump.
The 1” ball valve makes a good accent to the mixer, but it tends to be a bit stiff in actual usage. Over time, I may change this out with something which operates a bit easier. I have found that reducing to a 3/4 inch valve helps some, and a better quality valve seems to work a bit easier.


I discovered that unglued the parts will occasionally slip. (I was serving Margaritas in celebration of my 100th jump, and the inside elbow came flying off). So, I added stainless sheet metal screws (#8 X 3/8”) at several of the joints. I also added a 1 to 1/2 inch reducer to the output elbow, also held in place with a stainless screw. The screws can still be removed for cleaning as necessary. With no glue, the joints will eventually leak a bit. I have decided this is not an issue, but you may make a different decision. Gluing the joints should not be a problem, I just decided not to for ease of maintenance.
As an update, I now either glue or thread the joints. The vertical stem going into the “T” is threaded, and the recirculating elbow (inside the cooler) is threaded. In theory, this allows for more easy disassembly, however for it to work well, copious quantities of Teflon tape are a good idea, or the parts tend to “freeze” together. I have also change the vertical return tube to a clear PVC so the return line would be visible and also (when not mixing) provide a level indicator. (I have built but not tested the last modification.)
Keeping the unit clean and as dry as practical when not in use is pretty important. You do not want to pull it out for a party smelling like mildew.
Do not run the disposal too long when making drinks. A few minutes does not seem to affect the temperature noticeably, but after a while, you will have to add more ice to “Thicken” the drink, which ultimately waters down the drink.
The disposal I have apparently has a duty cycle. If I make a full batch of margaritas, then start another batch too soon, it has a tendency to “Thermal Off” part way through the second batch. Unfortunately, this can take up to half an hour to correct itself. I have not found a way to cool the motor windings, which is where the problem is.
If I am using the mixer often (every two weeks, or more), I tend to take the leftover (there usually is some) and freeze it into cylinders of 2 inches or less in diameter. I started using 16 oz water bottles. Then, when you start a new batch, you can start the cooling process with these blocks of margarita ice and not dilute the drink as much.
Hope you enjoy!
Paul Degenkolb